Chapter 3 C++
3.1 Introduction
In the Introduction to Algorithms and Programming (IAP), we covered the basics of programming in C++. This course will build on that foundation. Although several standards exist (C++17, C++20, C++23, C++26), we will use the C++23 standard throughout this course. C++11, C++14, and C++17 introduced several new features to the language and the Standard Template Library (STL). While these features may differ slightly from older versions, this will not significantly impact our course, but they do allow you to utilize some of the newer language features if you wish.
You should review a list of new C++ features to understand what the more modern versions of the language offer. Check the GCC, Clang, and MSDN websites for information on new features and compiler support. Keep in mind the specific language version when looking at code on the Internet, as such code may use features that are not part of the C++23 standard and may fail to compile properly in our environment.
The main aim of this course is to help you understand how to organize data at the lowest level in memory and consider the efficiency implications of different layouts. We will generally use raw pointers and manually handle memory allocation and deallocation. Note that this is not best practice in real-world coding; in those contexts, you should use smart pointers and RAII to manage memory, helping to avoid bugs and prevent leaks.
3.2 Compilation
3.2.1 Command Line
To compile a C++ program from the command line, use g++:
g++ -std=c++23 -o HelloWorld source1.cpp source2.cppExplanation
g++-
Invoke the GNU C++ compiler.
-std=c++23-
Tell g++ to activate all the C++23 language features.
-o HelloWorld-
Compile and Link the code to create an executable called:
HelloWorld. source1.cpp source2.cpp-
A list of input C++ source files.
3.2.2 Make
Typing the relevant g++ command and listing all your files is time-consuming and error-prone in larger projects. Typically, projects use Makefiles instead. make is a program that reads a Makefile and runs the relevant commands to compile your program. Once you have created your Makefile, to fully compile your program, you just type make in the terminal instead of the entire g++ command every time you need to compile.
Note that the indentation in Makefiles is mandatory and should be performed with a single TAB.
Here is a simple Makefile to automate the example above:
Now, whenever you type make in the terminal, it will compile your program as though you had typed the full g++ command each time.
make is actually a very clever program and can automatically detect all the .cpp files in the folder. The code below shows a more complicated Makefile. Don’t be intimidated—all you have to do is change the value of BIN from HelloWorld to the name of the output file you want. The rest will just work, assuming all the .cpp files in the folder should be compiled and linked together. This file compiles each .cpp file into an object file, then links them all together into an executable with the name stored in the BIN variable. Additionally, make can detect which files have changed. So, if you have files that take a long time to compile, only the updated .cpp files will be recompiled, then linked with the old object files. This can significantly speed up the compilation process!
BIN=HelloWorld            # Output executable/program name
CXX=g++                   # Which compiler to invoke
CXXFLAGS=-std=c++23 -Wall # What flags/options to use

SRC=$(wildcard *.cpp)     # Creates a list of all .cpp files
                          #  (source1.cpp, source2.cpp)
OBJ=$(SRC:%.cpp=%.o)      # Creates a list of object filenames
                          #  (source1.o, source2.o)
# Remember that source code is compiled into objects (.o) first,
#  and then linked into one executable file

all: $(OBJ)              # Before the executable, compile each OBJ
    $(CXX) -o $(BIN) $^  # g++ -o HelloWorld source1.o source2.o

%.o: %.cpp               # If .cpp changed, recompile .o
    $(CXX) $@ -c $<      # g++ source1.o -c source1.cpp

clean:                   # Rule to clean up any extra files
    rm -f *.o            # Delete all object files
    rm $(BIN)            # Delete the main executable
We have also created a target to tidy up the folder. If you type make clean, it will delete the compiled object and executable files, leaving only your source code behind.
3.2.3 Integrated Development Environments (IDEs)
Integrated Development Environments (IDEs) are software tools that enable you to create and manage projects with multiple source code files. These IDEs typically offer syntax highlighting for easier reading, file management for proper code structuring, and features for debugging and compilation. Using an IDE is highly recommended as it simplifies the coding process.
In this course, we will use Qt Creator. However, other excellent C++ IDEs, such as VS Code and CLion, are also available and suitable for this course. You can register for a free license using your Wits email address for both Qt Creator and CLion. In each lab, we will provide project files specifically for Qt Creator. You can open these files in Qt Creator, which will automatically load all the necessary source code, header files, and settings required to run the program.
Note that the IDE is primarily an editor, and we generally still require a separate compiler for each language we want to use. On Ubuntu, we can use the compiler included in the build-essential package; on Windows, the Qt Creator installation wizard can install the MinGW package; and on macOS, Xcode can install the Clang compiler, or Brew can install the g++ toolchain. This setup is discussed later in Section 3.6.
Within Qt Creator, simply click the play or debug button to compile, link, and run your code.
–>
3.3 Classes
In C++ (and all programming languages that support Object Orientation) we are able to create our own types by connecting many of the primitive types together. The normal primitive types are the ones that come with C++ and are built into the language – such as int, float, char, double and pointers. Note that a vector and all the other types that you #include into your files are usually classes and not primitive types. They have been added to C++ through the Standard Template Library.
A vector is a good example of why we might like a class. We will study them in more detail later on, but fundamentally, vectors store an integer that tracks the number of items being stored, it tracks the amount of memory that has been reserved and it keeps a pointer to that memory. It is useful to bundle these 3 variables into a single object that we can think of as a vector. We can then perform operations on that vector, such as push_back() or size(). When we group a number of types together into a single new type, this is called a Class. A class is a new type of variable – for example, Car is a Class, but a specific instance of a Car is an object.
class Car{
public:
   int num_wheels, num_doors;
   string colour;
   int coolness;

   Car(){
      // This is a constructor, which runs when the car is created
      // It should allocate memory and setup variables.
      num_wheels = 4;
      num_doors = 4;
      coolness = 10;
   }
   ~Car(){
      // This is a destructor, which runs when the car is destroyed
      // It should free memory and clean up any mess that it made (opened any files etc.)
   }

   float price(){
      // This is a member function
      if(colour == "Pink"){
         return 100*coolness + 10*num_wheels;
      }else{
         return 10*coolness + 5*num_wheels;
      }
   }
};

void main(){
   Car richardsCar;
   richardsCar.num_wheels = 5;     // We have a spare wheel
   richardsCar.colour = "Pink";    // Because I can
   richardsCar.coolness = 1000000; // Obviously

   Car stevesCar;
   stevesCar.num_wheels = 3;   // We've lost a wheel or two
   stevesCar.colour = "Blue";
   stevesCar.coolness = 1;

}
In the example above, Car is a class, it tells the compiler that we can have variables of type Car. richardsCar on the other hand, is an instance of a Car and we would say that richardsCar is an object. We see that the Car type has some members called num_wheels, num_doors, colour and coolness. These are values that are associated with each car that we create. In the example above we see that richardsCar and stevesCar are both instances of Cars and therefore each one has its own version of num_wheels, coolness etc.

Figure 3.2: Classes store their own values for member variables.
Classes can contain more than just data. They can also contain member functions. These functions belong to the class and usually operate on the data stored inside the class. For example, we have a function called price. This function only makes sense in the context of an actual instance of a Car. So we could ask “How much would you pay for richardsCar or stevesCar?” but you wouldn’t ever ask “How much would you pay for Car?”
In C++, classes are just like normal variable types. We can pass an instance of a car into a function by value or by reference. We can also get the address of that object as well.
class Car{...};

void print(Car& curr){ // The car is passed by reference
   cout << "There are " << curr.num_wheels << " wheels"
        << "and the car is " << curr.colour << "." << endl;
}
void paint(Car* curr, string new_colour){ // A pointer to the car is passed
   // When we have a pointer to an object we have two different ways
   // of accessing members:
   // A) Access the member function/variable through the pointer
   curr->colour = new_colour;
   // B) or Dereference the pointer and access the member
   (*curr).colour = new_colour;
}

void broken_paint(Car curr, string new_colour){
   // Watch out, here we pass the car by VALUE
   // This means that the function receives a copy of the car object
   //  and if we make any changes, they do not affect the original car
   curr.colour = new_colour;
}

void main(){
   Car richardsCar;
   richardsCar.num_wheels = 5;     // We have a spare wheel
   richardsCar.colour = "Pink";    // Because I can
   richardsCar.coolness = 1000000; // Obviously

   Car stevesCar;
   stevesCar.num_wheels = 3;   // We've lost a wheel or two
   stevesCar.colour = "Blue";
   stevesCar.coolness = 1;

   // Print takes references to the object.
   print(richardsCar); // There are 5 wheels and the car is Pink.
   print(stevesCar);   // There are 3 wheels and the car is Blue.

   // Paint takes pointers to the object and we need to pass the address.
   paint(&richardsCar, "Neon Pink"); // Richard's car is now Neon Pink.
   paint(&stevesCar, "Jungle Grey"); // Steve's car is now Jungle Grey.

   // broken_paint takes a copy of the object
   broken_paint(richardsCar, "Black"); // Richard's car is still Neon Pink
}
There are many finer details to objects and Object Orientation as a programming paradigm. We can do fancy things like abstract/virtual classes, interfaces, inheritance and polymorphism which allow us to create modular, reusable code. This is the main standard for programming in industry and you should learn as much about this paradigm as you can. You will learn about these concepts more formally in second and third-year courses (mostly in Mobile Computing 2 and Software Design 3).
For now, the important thing to remember about classes is that they allow us to build abstractions – you don’t know how a vector or a car works, but you know what member functions you can call and the documentation should tell you what those functions do. We don’t need to know how the class achieves those goals, just that the class will make sure it works. When you used a vector in IAP, you knew that you could use myVector.push_back(thing) even though you didn’t know how that function manipulated the underlying memory. The class abstracts away, or hides, the implementation details from you and you can focus on solving the actual problem that you care about.
However, we can’t completely ignore what the class is doing. Just because we’re making a single function call, doesn’t mean that the object is not doing a lot of work. These functions may contain loops, they may perform various memory allocations and could do any amount of work that we don’t know about. It is important to know that the way we are using classes is efficient. This is why we will look at a number of different data structures (like vectors) and algorithms (like push_back) to understand their computational complexity. This will allow you to use the right structure for the job and you’ll know that your code will still be efficient and scalable.
Here is another detailed description of classes and how they work:
There are also some more explanations if you are still not comfortable with classes:
- https://www.youtube.com/watch?v=2BP8NhxjrO0
- https://www.youtube.com/watch?v=ABRP_5RYhqU&t=71s
- https://www.youtube.com/watch?v=-IrueTrxNHA&t=202s
Additional Reading:
- Chapter 1.5 (the basics covered here) – Goodrich, Tamassia, and Mount (2011)
- Chapter 2 (more advanced) – Goodrich, Tamassia, and Mount (2011)
- Chapter 1.4 – Weiss (2014)
- Chapter 2.3, 2.4 – Dale, Weems, and Richards (2018)
Goodrich, Tamassia, and Mount (2011) cover this topic particularly nicely.
3.4 Pointers
Pointers are discussed in some detail in Section 10 of the “C++ Revision Notes” on Moodle. Please ensure that you’ve gone through those notes in detail. We will revisit the idea of pointers and dynamic memory allocation multiple times in this course.
I strongly recommend that you read through these sites and examples as well:
- https://www.geeksforgeeks.org/pointers-in-c-and-c-set-1-introduction-arithmetic-and-array/
- https://www.geeksforgeeks.org/pointers-c-examples/
Additional Reading:
- Chapter 1.5 – Weiss (2014)
3.5 Debugging
Debugging is twice as hard as writing the code in the first place. Therefore, if you write the code as cleverly as possible, you are, by definition, not smart enough to debug it.
Brian W. Kernighan
Finding bugs in your code can be an incredibly difficult task. When you have large, complex software systems, tracking down and fixing a bug can be a huge investment. In the best case, your code will crash and you’ll know that there is a problem. In the worst case, your code may continue running, but might have subtly corrupted it’s internal memory structures - in this case it looks like it is working, but may give you incorrect results. Debugging is such an important process that many software design patterns and tool have been developed purely to make debugging easier.
The most important tool when there is a bug in your code is called the debugger. It allows you you pause the execution of your code (with a breakpoint) and inspect the state of your program’s memory. You can view the call stack and the value stored in any of the memory addreses belonging to your application. You can also step through your code line by line and see where things start to go wrong.
Another useful time to pull out the debugger is when your code crashes. Unfortunately, C++ does not give us particularly useful error messages when our application crashes. Often it will just say Segmentation fault (core dumped). This generally means that we’ve tried to access memory that our program is not allowed to access and the operating system shut down the program for security purposes. Without a debugger it can be extremely hard to find out where our code crashed, but if we run our code with a debugger then it will show us exactly which line was running when the code crashed.
The video below explains how to use the GDB debugger and the debugger in QtCreator. In general, you should always use the debugger in QtCreator.
3.6 Setting up your environment
There are a few different ways to get your environment set up. I suggest that you use QtCreator as your IDE. Throughout this course, all labs will come with a QtCreator project file.
Go to https://www.qt.io/offline-installers and download the “5.12.x Offline Installers” file for your relevant operating system.
3.6.1 Linux
While connected to the internet, open a terminal and run the following commands:
cd Downloads
# Install the compiler
sudo apt install build-essential
# Allow execution
chmod +x ./qt-opensource-linux-x64-5.12.12.run
# Install Qt, QtCreator
./qt-opensource-linux-x64-5.12.12.run
If the version numbers are different then update the filenames above accordingly. When you launch QtCreator the first time, it may show a bar along the bottom with a button to “Link with Qt”. If so, click that button and then enter the Qt installation path that you used during installation.
3.6.2 Windows/MacOS
MinGW is a version of g++ for Windows. MinGW can be installed as part of QtCreator (see the steps below). You can also download MinGW-64 directly from http://mingw-w64.org/doku.php. This will give you a terminal and technically everything that you need to compile, but generally I suggest that you just use QtCreator to install everything.
During the install process, make sure to select "MinGW 64-bit" (under both "Qt 5.12.x" and under "Developer and Designer Tools" ) and "Qt Creator 5.0.2" at the bottom of the list of components as shown in Figure 3.7.
If you would prefer to use CLion there is a tutorial here: https://www.jetbrains.com/help/clion/quick-tutorial-on-configuring-clion-on-windows.html. Wits has licences for all the JetBrains products, just sign up for an account with your Wits email address.
3.6.3 Installing Qt

Figure 3.3: If you don’t have a Qt account then create one for free, enter the username and password, then click Next.
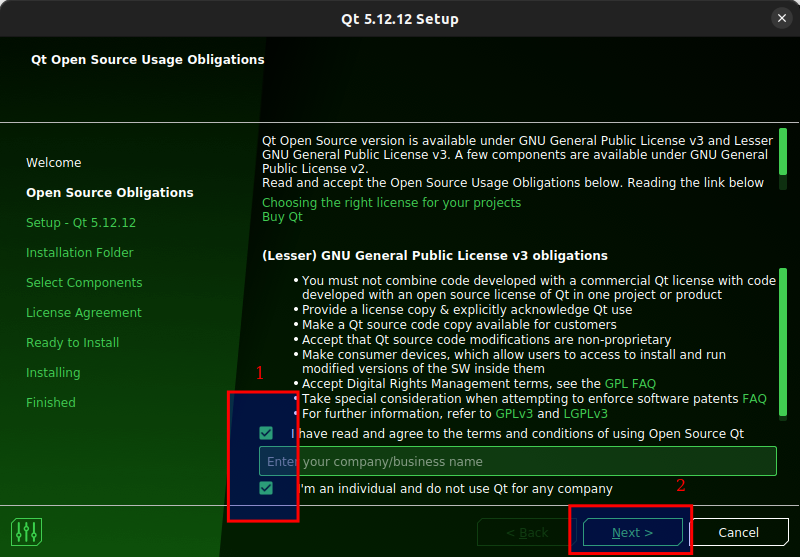
Figure 3.4: Tick both boxes and click Next.
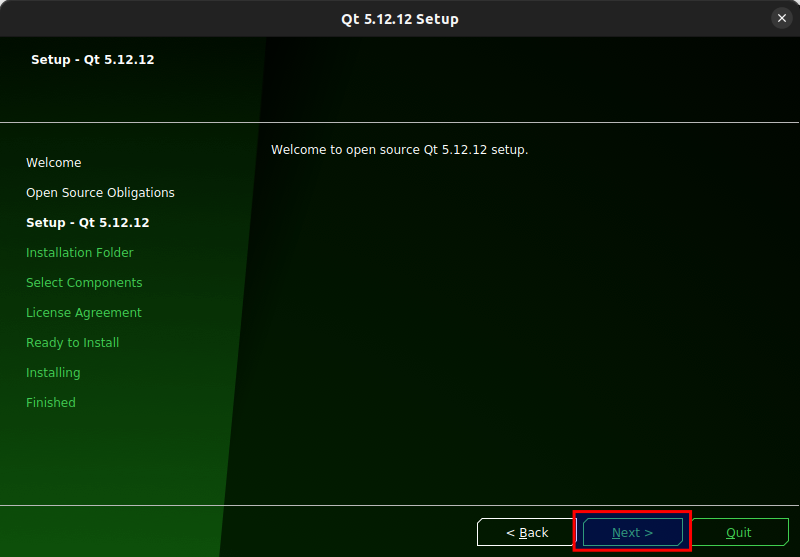
Figure 3.5: Click Next.
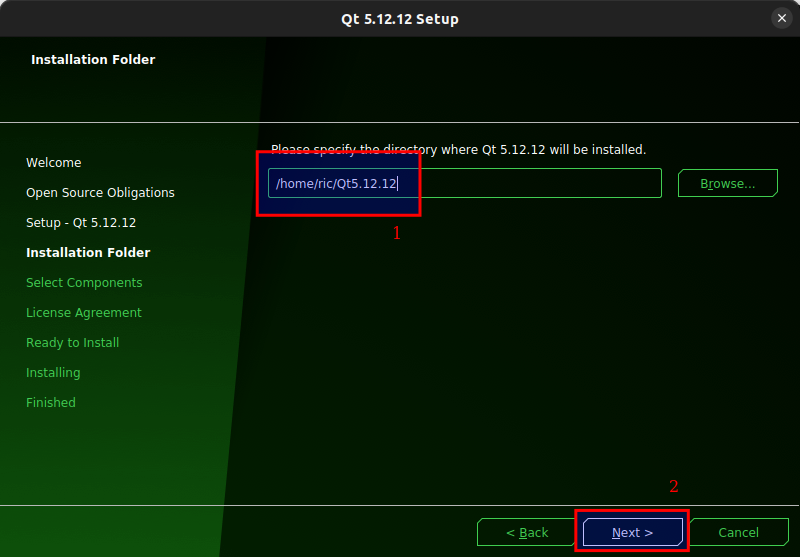
Figure 3.6: Set the path where you want to install Qt. The default value should be fine. Remember this path. Click Next.
Figure 3.7: Windows: Make sure to select “MinGW 64-bit” (in two places) and “Qt Creator 5.0.x”, then click Next.
Figure 3.8: Linux: Make sure to select “Desktop gcc 64-bit” and “Qt Creator 5.0.2”, then click Next.
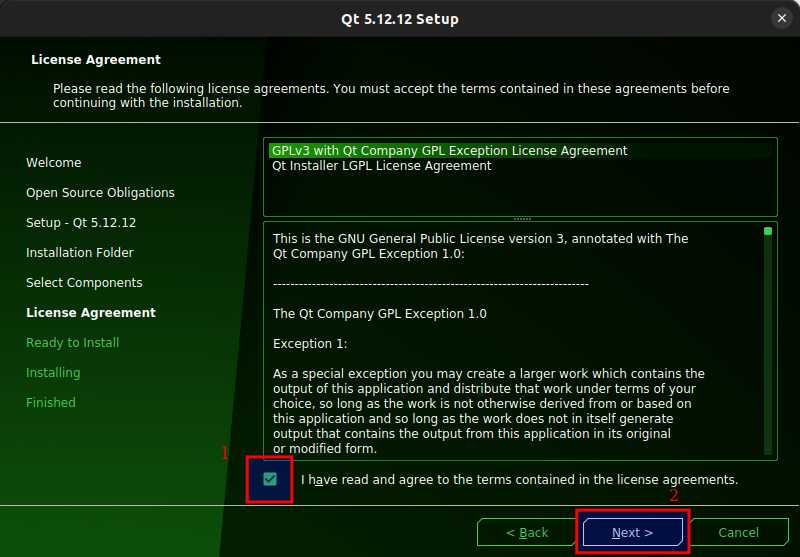
Figure 3.9: Accept the terms of the GPLv3 and click Next.
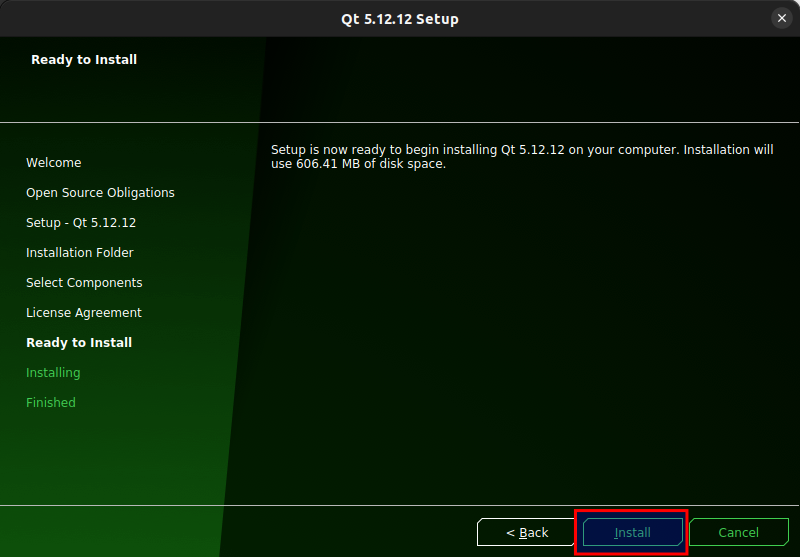
Figure 3.10: Click Install.