Chapter 2 C++ Revision
2.1 Introduction
Welcome back to C++! In Introduction to Algorithms and Programming (IAP) you learned the basics of the language. This course builds on that knowledge, focusing more on the problem solving, efficiency and memory layout aspects. We do all of this using the C++23 standard.
Throughout your studies, you might also see code that targets older standards such as C++11, C++14, C++17, or C++20. Each release added useful features to both the language and the Standard Template Library (STL). Most of that code will still compile under C++23, but if you find something that relies on a feature newer than C++23 it may not work in our environment. Similarly, there are some minor changes that can break old code if you’re not careful - for example, size is now a function in std.
Why we care about memory
The main goal of this course is to show how the layout of data in memory affects for speed and efficiency. To keep things transparent we’ll use raw pointers and manually manage memory with new and delete. In real‑world projects you’d normally use smart pointers and RAII to do this safely, but seeing the manual steps first makes the automated tools easier to understand later. Typically, you would want to avoid raw pointers.
Quick tip: If you’re curious about the latest C++ additions, take a look at the feature lists on the GCC, Clang, or MSVC websites.
2.2 Compilation
2.2.1 Command Line
To compile a C++ program from the command line, use g++:
Explanation
| Flag / Term | Meaning |
|---|---|
g++ |
Invoke the GNU C++ compiler. |
-std=c++23 |
Tell g++ to activate all the C++23 language features. |
-o outputfile |
Compile and link the code to create an executable called outputfile. |
source1.cpp source2.cpp |
A list of input C++ source files. |
2.2.2 Make
We’ll be using makefiles often in this course. A makefile is just a plain text file that gives instructions to the make tool on how to compile your program. Once it’s set up correctly, you can compile your whole project simply by running make in the terminal.
Here is a sample makefile.
Now, whenever you type make in the terminal, it will compile your program with that command.
Make is actually a very clever program and can automatically detect all the .cpp files in the folder. The code below shows a more complicated makefile, don’t be scared of it—all you have to do is change the value of BIN from HelloWorld to the name of output file you want. The rest will just work.
BIN       = HelloWorld             ## Output executable/program name
CXX       = g++                    ## Which compiler to invoke
CXXFLAGS  = -std=c++23 -Wall       ## What flags/options to use

SRC       = $(wildcard *.cpp)      ## Creates a list of all .cpp files
                                   ## (source1.cpp, source2.cpp)
OBJ       = $(SRC:%.cpp=%.o)       ## Creates a list of object filenames
                                   ## (source1.o, source2.o)
                                   ## Remember that source code is compiled into
                                   ## objects (.o) first, and then linked into one
                                   ## executable file

all: $(OBJ)                        ## Build the final executable
  $(CXX) $(CXXFLAGS) -o $(BIN) $^  ## g++ -o HelloWorld source1.o source2.o

%.o: %.cpp                         ## If .cpp changed, recompile .o
  $(CXX) $(CXXFLAGS) -c $< -o $@

clean:                             ## Rule to clean up any extra files
  rm -f *.o                       ## Delete all object files
  rm -f $(BIN)                    ## Delete the main executable
With this makefile you can type make and it will automatically compile and link all the .cpp files in the folder to create an executable called HelloWorld. If you type make clean it will delete the compiled files, leaving only your source code behind.
Note: The indentation is mandatory and should be a single TAB.
2.2.3 Integrated Development Environments (IDEs)
Integrated Development Environments (IDEs) are software tools that help you write, debug, and manage projects that span multiple source code files. They typically offer features like syntax highlighting, file management, build integration, and debugging tools — all of which make coding much easier, especially when projects grow in size. Using an IDE is highly recommended for this course.
We will primarily use VS Code. It is free, lightweight, does not require you to register or create an account, and runs identically on Windows, macOS, and Linux.
Other IDEs like Qt Creator and CLion are also suitable, and Qt Creator/CLion offer free educational licenses when you register with your Wits email address. However, all labs, support, and these notes are written assuming you are using VS Code.
⚠️ IDEs are just editors — you still need to have a working compiler installed separately. On Ubuntu, install the
build-essentialpackage; on Windows, install MSYS2 (MinGW); and on macOS, install the Xcode Command Line Tools. This is covered in detail below.This setup is discussed later in Section 2.17.
Finally, note that modern IDEs such as VS Code or Cursor can integrate AI-based assistants like GitHub Copilot. These tools can significantly boost productivity by generating code suggestions or completing functions. However, while they are useful for experienced developers, you must first focus on developing your own problem-solving and coding skills without such assistance. This is especially important because AI tools will not be available during invigilated assessments — you will be expected to write, debug, and reason about your code independently.
You first had to learn your times tables in school so that later, when you were allowed to use a calculator, you already understood how the numbers worked. In the same way, mastering the basics of programming without AI assistance will make you a far more capable and confident in the long run.
2.3 Hello World!
Copy the code below into a hello.cpp file and the code makefile from above into a file called makefile.
1 #include <iostream>
2
3 using namespace std;
4
5 int main(){
6     cout << "Hello World!" << endl;
7     return 0;
8 }
Open a terminal and navigate to the folder containing the files you just created and run make. List the files using the ls command. You should see a hello.o and HelloWorld. Run the new executable by typing ./HelloWorld and you should see output similar to that of Figure 2.1.
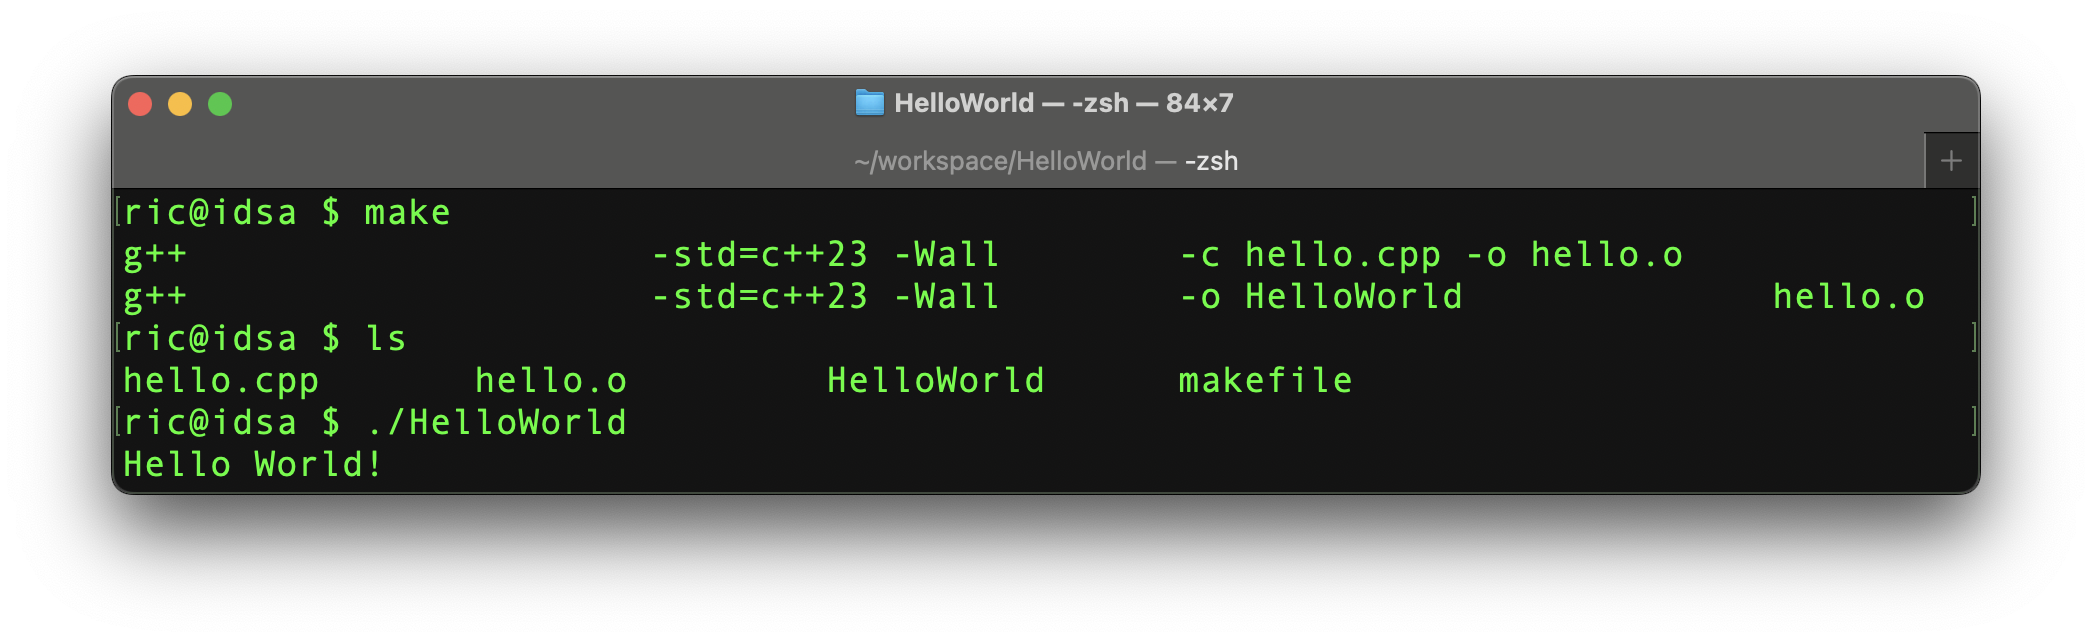
Figure 2.1: Compiling and running HelloWorld
Recall that any line that starts with a hash (#) is a pre‑processor directive. The pre‑processor looks at the code first and follows any pre‑processor directives before passing the final code to the actual compiler. Remember that pre‑processor commands do not end with a semi‑colon (;). Line 1 tells the pre‑processor to include the contents of the iostream header file. To view the output of the pre‑processor, use the -E command of g++.
C++ allows us to organise functions and objects into groups called namespaces. C++ puts its built‑in features in the std namespace. Line 3 of our program tells the compiler to look for functions and objects inside the std namespace. If we did not include line 3, we would need to explicitly tell the compiler where to find each object using the scope (::) operator. Thus we could have written our program as shown below.
1 #include <iostream>
2
3 //using namespace std;
4
5 int main(){
6     std::cout << "Hello World!" << std::endl;
7     return 0;
8 }
Remember that C++ always starts execution with the int main() which we see on line 5. This is just a normal function that returns an int when it finishes – as seen on line 7. On most systems, returning 0 tells the operating system that everything finished correctly. Returning anything else usually means there was an error.
Finally, on line 6 our program uses the cout object from the std namespace to print to the terminal through stdout. We first print the words Hello World! followed by the end‑of‑line character (endl).
std::endl prints out a new‑line character and flushes the output buffer. Flushing the output buffer tells the system to actually print the characters to the screen.
2.4 Data Types
C++ gives us a number of built‑in data types. These allow us to store different types of information, such as integers, real numbers and characters. Some of the most useful data types are listed in Table 2.1.
| Type | Description | Min.Size | Typical.Size |
|---|---|---|---|
bool |
Boolean (true/false) | 1 bit | 8 bits |
char |
Character | 8 bits | 8 bits |
int |
Integer | 16 bits | 32 bits |
long |
Long Integer | 32 bits | 64 bits |
long long |
Even Longer Integer | 64 bits | 64 bits |
float |
Single-Precision Floating-Point | 6 significant digits | 32 bits |
double |
Double-Precision Floating-Point | 15 significant digits | 64 bits |
While the C++ standard provides a minimum size for each type, compilers are allowed to implement the types using larger sizes if they wish, based on the architecture of the system. Usually this is influenced by the word length of the hardware. We can use the sizeof() function to tell us how big the type is, in bytes; by multiplying by 8 we can calculate bits. The code below displays the size of each data type with the output in Figure 2.2.
1 #include <iostream>
2
3 using namespace std;
4
5 int main(){
6     cout << "Type\t\tSize (Bits)" << endl
7          << " bool\t\t " << 8*sizeof(bool)   << endl
8          << " char\t\t " << 8*sizeof(char)   << endl
9          << " int\t\t "  << 8*sizeof(int)    << endl
10         << " long\t\t " << 8*sizeof(long)   << endl
11         << " long long\t " << 8*sizeof(long long) << endl
12         << " float\t\t " << 8*sizeof(float)  << endl
13         << " double\t\t "<< 8*sizeof(double) << endl;
14
15     return 0;
16 }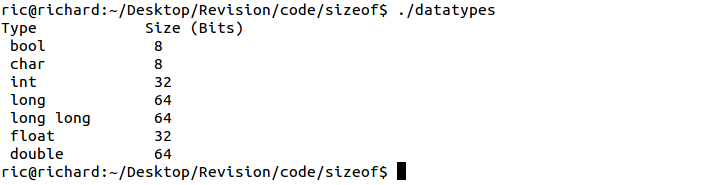
Figure 2.2: DataType Sizes on x86-64
Based on the sizes calculated above, Figure 2.3 shows the range of each type. Each type — other than bool, float and double – has two versions: signed and unsigned. Previously, the C++ standard said that at a signed variable’s range should be evenly split between positive and negative numbers but did not dictate the actual representation of these numbers. Since C++20, compilers are required to use twos complement to represent negative numbers, although this was common beforehand. Floats and doubles usually use the formats specified in the IEEE 754 standard. By default char is unsigned, while the other integral types are signed.
There are also a number of types defined in <cstdint> that have explicitly sized types2: int8_t, int16_t, int32_t, uint8_t, uint16_t, uint32_t.
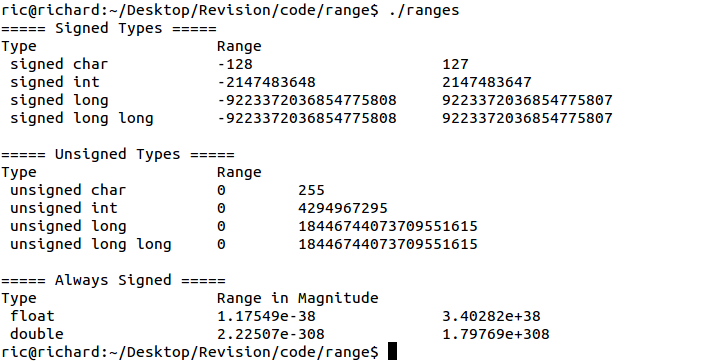
Figure 2.3: DataType Ranges on x86-64
Ranges can be found by including the <limits> header and using:
For example:
2.5 Strings
Another useful data type is the C++ string. In C, strings are represented as arrays of characters with a null‑character ('\0') at the end. C++ strings are implemented in the same way, but are wrapped in a class that makes them easier to deal with.
Firstly we need to include the <string> header file after which we can use strings in the same way that we use any other data type. You should familiarise yourself with the basic operations of the string class.
The code below demonstrates some common operations available in the string class. There are many more useful functions, so it’s worth exploring the documentation — that way, you won’t end up reimplementing features that already exist
1  #include <iostream>
2  #include <string>
3
4  using namespace std;
5
6  int main(){
7     // I’m an empty string.
8     string s1;
9     // s2 gets a copy of the characters in s1
10    string s2 = s1;
11    // s3 gets a copy of the characters in the string literal
12    string s3 = "HelloWorld!";
13    // s4 contains "yyyyy"
14    string s4(5,'y');
15    // We can print strings
16    cout << s3 << endl;
17    // We can read a word until we find a space
18    cin >> s1;
19    // ... or we can read all the individual words in the buffer
20    while(cin >> s1){
21        // Do something with each word we find until we run out
22    }
23    // We can read a line from stdin
24    getline(cin, s1);
25    // Check if a string is empty
26    if(s1.empty()) {}
27    // Get the size of a string
28    int n = s4.size();
29    for(int i = 0; i < n; i++){
30        // We can access individual characters of the string.
31        char c = s4[i];
32    }
33    // Concatenate strings. s5 is "HelloWorld!yyyyy"
34    string s5 = s3 + s4;
35    // Copy characters from one string to another
36    s1 = s4;
37    // Check whether strings have the same characters
38    if (s1 == s4) {}
39    // ... or check that they don’t
40    if (s1 != s5) {}
41    // ... or check alphabetical order (<, <=, ==, >, >=)
42    if (s2 < s4) {}
43 }
From C++17 onwards, the standard library also includes std::string_view. This is a lightweight, non-owning reference to a string (or part of a string). Unlike std::string, a string_view does not manage memory — it simply provides a view into an existing string or character array. This makes it faster to pass around and ideal for read-only access, especially in performance-critical code. Just be careful not to use a string_view after the original string it refers to has been modified or destroyed, as it does not make a copy of the data. Imagine that internally, the string_view stores a pointer to the original string.
2.6 Reading input from stdin
In the previous examples, we wrote text to the terminal through stdout by using the std::cout object. To read from the terminal through stdin we make use of the std::cin object.
cin’s syntax is similar to that of cout except the angle brackets face the other direction, illustrating how data goes from cin to the relevant variable. Listing 7 shows some standard ways of reading from stdin using cin.
1 #include <iostream>
2 #include <string>
3
4 using namespace std;
5
6 int main(){
7     char c; int i; long l; float f; double d; string s;
8
9     cin >> c; // read a char
10    cout << "I read char: " << c << endl;
11
12    cin >> i; // read an int
13    cout << "I read int: " << i << endl;
14
15    cin >> l; // read a long
16    cout << "I read long: " << l << endl;
17
18    cin >> f; // read a float
19    cout << "I read float: " << f << endl;
20
21    cin >> d; // read a double
22    cout << "I read double: " << d << endl;
23
24    cin >> s; // read a word (stop at whitespace)
25    cout << s << " is the word." << endl;
26
27    getline(cin, s); // read a line
28    cout << "Here is the whole line: " << s << endl;
29
30    // Loop over inputs separated by ';' eg: Apple;Bannana;Pear
31    while (getline(cin, s, ';')) {
32        cout << "Got: " << s << endl;
33    }
34 }
2.7 Vectors
Vectors are a type of smart array in C++. They have many uses and can be accessed in a way similar to the standard arrays that you have already seen. We will discuss them later on in this course after dealing with our first few data structures. You could store a number of strings in a vector as shown below.
1  #include <vector>
2  #include <string>
3  #include <iostream>
4
5  using namespace std;
6
7  int main(){
8     // Create a vector that holds strings
9     vector<string> lines;
10
11    // Read 10 lines of text from stdin
12    for(int i = 0; i < 10; ++i){
13        // Create a temporary string to read to
14        string curr;
15        // Read a line from stdin
16        getline(cin, curr);
17        // Add the current line to the back of the vector
18        lines.push_back(curr);
19    }
20
21    // Print the lines (index‑based)
22    for(int i = 0; i < 10; ++i){
23        cout << "Line " << i << ": " << lines[i] << endl;
24    }
25
26    // Range‑based for loop
27    for(string s : lines){
28        cout << s << endl;
29    }
30
31    return 0;
32 }
2.8 Branching (If Statements)
All programs need to do some sort of logic. Under some conditions they do one thing, and under others they do something else. We use if statements to select which branch of our code will be run.
if(condition){
    // Statements to execute if condition is true
}else{
    // Statements to execute if condition is false
}
The condition can be any expression. If boolean, the condition is either true or false. If any other type, the result will be cast to an integer: if it is 0 the expression is false, if it is any other number the expression is true.
We can also check whether pointers point to some address or whether they are the nullptr. The two approaches below are equivalent.
if(ptr != nullptr){
    // ptr points to some address
}else{
    // ptr is null
}

if(ptr){
    // ptr points to some address
}else{
    // ptr is null
}
The three fundamental logic operators are NOT (!), AND (&&) and OR (||). With round brackets () they can be used in combination with any other logical operators or expressions to produce a boolean value. AND and OR are both short‑circuiting, which means that an evaluation starts on the left and as soon as the overall answer is known, evaluation stops.
This is particularly useful when avoiding errors like dividing by zero:
 1 int n;
 2 double sum;
 3 // Calculate values for n and sum from data
 4
 5 // Check that the average is bigger than something
 6 if (sum/n >= something){
 7     // Cancel Missile launch
 8 }
 9
10 // But what happens if n happens to be 0?
11 // Then our program crashes online 6     :(
12 // We should rather say:
13 if (n != 0 && sum/n >= something){
14     // C++ starts on the left and checks that n != 0
15     // If n is 0, then the first part is False.
16     // False && False = False
17     // False && True  = False
18     // So the system doesn’t need to evaluate the second part
19     // We already know that it’s false regardless of the second part
20
21     // If n is not 0, then first part is True.
22     // True && False = False
23     // True && True  = True
24     // We need the second part to figure out the overall condition
25     // But it’s ok, because we know that we can divide by n safely.
26 }
2.9 Loops
Loops allow us to repeat sections of code until some condition is no longer true. There are three types of loops in C++.
All loops can be exited early by using the break keyword. Similarly, you can skip to the end of the body by calling continue; after this the increment, if present, will be performed and the condition checked.
2.9.1 While Loops
A while loop checks the condition at the start of the loop. If the condition is false, then it will not execute the expressions inside the body of the loop. If the condition is true, then it will run through the expressions inside the body of the loop, in sequence, repeatedly, until the condition is no longer true.
If the condition starts off false, then the inner contents of the loop will never run.
2.9.2 Do Loops
A do loop is almost exactly the same as a while loop, except it checks the condition at the end of the loop. This means that the body of the loop is guaranteed to run at least once, regardless of whether the condition is true or false.
2.9.3 For Loops
It often happens that we need to repeat some code a number of times. For loops provide a convenient method to do so. For loops first run the initialiser, this usually declares some counter variable. It then checks the condition; if it is true, we enter the loop. After executing the last statement in the body of the loop, we run the code in the increment section, which usually updates our counter. After that, we check the condition again and either enter the loop again (if it’s true) or continue with the code that follows the loop (if it’s false).
2.10 Pointers
2.10.1 Basics
Pointers are variables, just like any other, except they contain the memory address of another object/variable. To aid understanding in this section, we will use hexadecimal representations for memory addresses, and decimal representations for values, but it is worth noting that everything is just represented in binary on the hardware. Suppose we have the following code fragment:
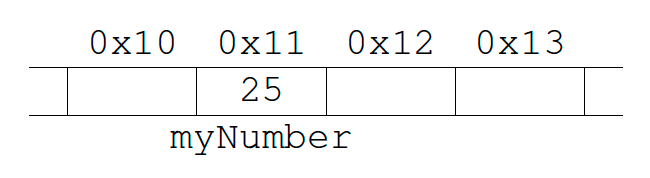
Figure 2.4: Memory Layout
When the compiler sees the code, it allocates enough space to store myNumber in memory. In Figure 2.4 we can see that the compiler decided to store myNumber in memory address 0x11.
A pointer to myNumber is simply another variable that stores the address 0x11.
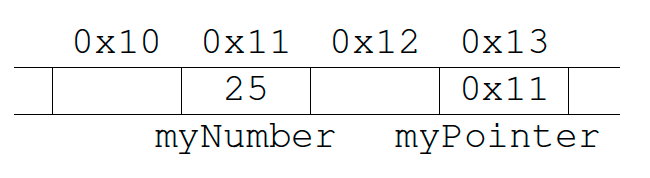
Figure 2.5: Memory Layout with a Pointer
To declare a pointer we use the * operator as seen on line 4 above. To get the address of myNumber, we use the reference operator (&), as seen on line 5.
Pointers are useful, because we can follow the address stored inside it (0x11) and see what value is stored there. To do this we use the dereference operator (*) followed by the name of the pointer variable. We can also use a dereferenced pointer to edit the original variable:
1 int myNumber;
2 myNumber = 25;
3
4 int *myPointer;
5 myPointer = &myNumber; // Store the address of myNumber inside myPointer
6
7 cout << "The value stored in myNumber is: " << myNumber << "\n"
8 << "The value stored in myPointer is: " << myPointer << "\n"
9 << "If we follow myPointer we get: " << *myPointer << endl;
10
11 cout << "Running: *myPointer = 42;\n" << endl;
12 *myPointer = 42; // Go to the address from myPointer and store 42 there
13 cout << "The value stored in myNumber is: " << myNumber << "\n"
14 << "The value stored in myPointer is: " << myPointer << "\n"
15 << "If we follow myPointer we get: " << *myPointer << endl;
16
17 cout << "Running: myNumber = 1;\n" << endl;
18 myNumber = 1;
19 cout << "The value stored in myNumber is: " << myNumber << "\n"
20 << "The value stored in myPointer is: " << myPointer << "\n"
21 << "If we follow myPointer we get: " << *myPointer << endl;This process is fairly easy to remember.
- If we want to declare an integer, we use:
- If we want to declare a pointer to an integer, we use:
This means that both varName and *pName are of type int.
Pointers can point to any type or object that has been defined, so we can have declarations like:
bool      *pointer_to_bool;
char      *pointer_to_char;
int       *pointer_to_int;
long      *pointer_to_long;
long long *pointer_to_long_long;
float     *pointer_to_float;
double    *pointer_to_double;
// We can also have pointers to Structs and Classes
Car       *pointer_to_car;
Student   *pointer_to_student;
string    *pointer_to_string;
2.10.2 Initialisation & Null Pointers
The most common reason your program will crash is because of a Segmentation Fault.3
This means that you have tried to access memory that is outside your program’s memory segment. Most commonly this is because you have tried to dereference or follow a pointer that doesn’t actually point to anything. Often this happens because you haven’t initialised a pointer to point to something before trying to dereference it – this is dangerous and the best outcome is that your program crashes. Other outcomes could be that your program corrupts itself or returns results that look correct, but aren’t.
int *myPointer;
// This might crash – myPointer doesn’t point to anything :(
cout << myPointer[0] << endl;

// Allocate memory and make myPointer point to it
myPointer = new int[10];    // Allocate space for 10 integers next to each other
myPointer[0] = 42;
cout << myPointer[0] << endl;

// We’re now finished with that memory so we can deallocate it.
delete [] myPointer;

// This might crash because we don’t own that memory anymore :(
cout << myPointer[0] << endl;
When you first declare a pointer, it contains garbage – whatever was in that memory space at the time. Referencing that memory is undefined behaviour. To save yourself a lot of pain and suffering, you should always initialise a pointer to the nullptr as shown below:
If you try to dereference the nullptr your program will definitely crash – this is a good thing because you can identify the problem immediately. Similarly, when you delete an object to which a pointer points, you should set it to the nullptr so ensure that you don’t accidentally try to use it later.
2.11 References
References are a unique construct in C++. They are like aliases to other variables or objects: while they’re similar to pointers in that they refer to some object, they are different in some fundamental ways.
- A reference must be initialised to point at an object when it is declared.
- A reference cannot be changed to point at a different object after it’s been declared.
- A reference is guaranteed never to be null because of these rules.
When using a reference to an object, imagine that you’re actually using the original object. This is particularly useful for passing objects to functions by reference, rather than using pointers. This means that inside the function you can assume the reference refers to an object and you do not need to check for a nullptr like you would with a raw pointer.
In the past, you needed to use pointers to pass by reference. The danger here is that if one passes an invalid or null pointer, the function may crash when dereferencing it. Even worse, the program may not crash and rather corrupt other data in memory. References are safe because they must be initialised to an existing object when they’re declared and will therefore avoid these kinds of bugs.
References are much safer to use than pointers, but they are not as powerful. They should be used over pointers when appropriate, but are not replacements for pointers.
Here are some examples of references in use:
 1 #include <iostream>
 2
 3 using namespace std;
 4
 5 void myFunction(int value, int &reference,
 6                 int *pointer, int *pointer2){
 7    // A change in value will not propagate back to main
 8    value = 100;
 9    // A change in reference *will* propagate back
10    reference = 200;
11    // A change via dereferenced pointer will propagate back
12    *pointer = 300;
13    // Changing a pointer *without* dereferencing will *not*
14    // propagate back
15    int temp = 400;
16    pointer2 = &temp; // The pointer2 variable stores the address of temp
17 }
18
19 int main(){
20    int val = 0, ref = 2, ptr = 3, ptr2 = 4;
21
22    cout << "Val: " << val
23         << "\nRef: " << ref
24         << "\nPrt: " << ptr
25         << "\nPrt2: " << ptr2 << endl;
26
27    myFunction(val, ref, &ptr, &ptr2);
28
29    cout << "Val: " << val
30         << "\nRef: " << ref
31         << "\nPrt: " << ptr
32         << "\nPrt2: " << ptr2 << endl;
33 }
As an exercise, predict what the output of this code will be. Afterwards, compile and run this code to check your solution.
2.12 Classes
In C++ (and all programming languages that support Object Orientation) we are able to create our own types by connecting many of the primitive types together. The normal primitive types are the ones that come with C++ and are built into the language – such as int, float, char, double and pointers. Note that a vector and all the other types that you #include into your files are usually classes and not primitive types. They have been added to C++ through the Standard Template Library.
A vector is a good example of why we might like a class. We will study them in more detail later on, but fundamentally, vectors store an integer that tracks the number of items being stored, it tracks the amount of memory that has been reserved and it keeps a pointer to that memory. It is useful to bundle these 3 variables into a single object that we can think of as a vector. We can then perform operations on that vector, such as push_back() or size(). When we group a number of types together into a single new type, this is called a Class. A class is a new type of variable – for example, Car is a Class, but a specific instance of a Car is an object.
class Car{
public:
   int num_wheels, num_doors;
   string colour;
   int coolness;

   Car(){
      // This is a constructor, which runs when the car is created
      // It should allocate memory and setup variables.
      num_wheels = 4;
      num_doors = 4;
      coolness = 10;
   }
   ~Car(){
      // This is a destructor, which runs when the car is destroyed
      // It should free memory and clean up any mess that it made (opened any files etc.)
   }

   float price(){
      // This is a member function
      if(colour == "Pink"){
         return 100*coolness + 10*num_wheels;
      }else{
         return 10*coolness + 5*num_wheels;
      }
   }
};

void main(){
   Car richardsCar;
   richardsCar.num_wheels = 5;     // We have a spare wheel
   richardsCar.colour = "Pink";
   richardsCar.coolness = 1000000; // Obviously

   Car stevesCar;
   stevesCar.num_wheels = 3;       // We've lost a wheel or two
   stevesCar.colour = "Blue";
   stevesCar.coolness = 1;
}
In the example above, Car is a class, it tells the compiler that we can have variables of type Car. richardsCar on the other hand, is an instance of a Car and we would say that richardsCar is an object. We see that the Car type has some members called num_wheels, num_doors, colour and coolness. These are values that are associated with each car that we create. In the example above we see that richardsCar and stevesCar are both instances of Cars and therefore each one has its own version of num_wheels, coolness etc.

Figure 2.6: Classes store their own values for member variables.
Classes can contain more than just data. They can also contain member functions. These functions belong to the class and usually operate on the data stored inside the class. For example, we have a function called price. This function only makes sense in the context of an actual instance of a Car. So we could ask “How much would you pay for richardsCar or stevesCar?” but you wouldn’t ever ask “How much would you pay for Car?”
In C++, classes are just like normal variable types. We can pass an instance of a car into a function by value or by reference. We can also get the address of that object and store it in a pointer.
class Car{...};

void print(Car& curr){ // The car is passed by reference
   cout << "There are " << curr.num_wheels << " wheels"
        << "and the car is " << curr.colour << "." << endl;
}
void paint(Car* curr, string new_colour){ // A pointer to the car is passed
   // When we have a pointer to an object we have two equivalent ways
   // of accessing members:
   // A) Access the member function/variable through the pointer
   curr->colour = new_colour;
   // B) or Dereference the pointer and access the member
   (*curr).colour = new_colour;
}

void broken_paint(Car curr, string new_colour){
   // Watch out, here we pass the car by VALUE
   // This means that the function receives a copy of the car object
   //  and if we make any changes, they do *not* affect the original car
   curr.colour = new_colour;
}

void main(){
   Car richardsCar;
   richardsCar.num_wheels = 5;     // We have a spare wheel
   richardsCar.colour = "Pink";
   richardsCar.coolness = 1000000; // Obviously

   Car stevesCar;
   stevesCar.num_wheels = 3;   // We've lost a wheel or two
   stevesCar.colour = "Blue";
   stevesCar.coolness = 1;

   // Print takes references to the object.
   print(richardsCar); // There are 5 wheels and the car is Pink.
   print(stevesCar);   // There are 3 wheels and the car is Blue.

   // Paint takes pointers to the object and we need to pass the address.
   paint(&richardsCar, "Neon Pink"); // Richard's car is now Neon Pink.
   paint(&stevesCar, "Jungle Grey"); // Steve's car is now Jungle Grey.

   // broken_paint takes a copy of the object
   broken_paint(richardsCar, "Black"); // Richard's car is still Neon Pink
}
There are many finer details to objects and Object Orientation as a programming paradigm. We can do fancy things like abstract/virtual classes, interfaces, inheritance and polymorphism which allow us to create modular, reusable code. This is the main standard for programming in industry and you should learn as much about this paradigm as you can. You will learn about these concepts more formally in second and third-year courses (mostly in Mobile Computing 2 and Software Design 3).
For now, the important thing to remember about classes is that they allow us to build abstractions – you don’t know how a vector or a car works, but you know what member functions you can call and the documentation should tell you what those functions do. We don’t need to know how the class achieves those goals, just that the class will make sure it works. When you used a vector in IAP, you knew that you could use myVector.push_back(thing) even though you didn’t know how that function manipulated the underlying memory. The class abstracts away, or hides, the implementation details from you and you can focus on solving the actual problem that you care about.
However, we can’t completely ignore what the class is doing. Just because we’re making a single function call, doesn’t mean that the object is not doing a lot of work. These functions may contain loops, they may perform various memory allocations and could do any amount of work that we don’t know about. It is important to know that the way we are using classes is efficient. This is why we will look at a number of different data structures (like vectors) and algorithms (like push_back) to understand their computational complexity. This will allow you to use the right structure for the job and you’ll know that your code will still be efficient and scalable.
Here is another detailed description of classes and how they work:
There are also some more explanations if you are still not comfortable with classes:
- https://www.youtube.com/watch?v=2BP8NhxjrO0
- https://www.youtube.com/watch?v=ABRP_5RYhqU&t=71s
- https://www.youtube.com/watch?v=-IrueTrxNHA&t=202s
Additional Reading:
- Chapter 1.5 (the basics covered here) – Goodrich et al. (2011)
- Chapter 2 (more advanced) – Goodrich et al. (2011)
- Chapter 1.4 – Weiss (2014)
- Chapter 2.3, 2.4 – Dale et al. (2018)
Goodrich et al. (2011) cover this topic particularly nicely.
2.13 Arrays
Arrays allow us to store a number of items of any type. When you allocate an array its size is fixed. An array’s size can only be ‘changed’ by allocating a new array, copying the elements across and then freeing the old array.
When you ask for memory for an array, you get one large contiguous block of memory; this means all of the objects are stored next to each other which makes accessing an array fast. This is because the compiler knows exactly where to look to find the n‑th object (startAddress + i × sizeof(type)). You need to manually remember the length of the array and the program will not automatically crash if you try access something beyond the end of the array. You need to be very careful that you do not index beyond the bounds of your array. This is why things like vector exist – to wrap arrays and do some extra safety checks for you.
Below, we allocate, use and free an array.
1 #include <iostream>
2 #include "student.h"
3 #include <random>
4
5 using namespace std;
6
7 int main() {
8     // A statically allocated array of 5 integers
9     int myNumbers[5];
10    // Dynamically allocated array of 5 integers
11    int *moreNumbers = new int[5];
12
13    moreNumbers[0] = myNumbers[4] + myNumbers[1];
14
15    int numStudents = 250;
16    // A statically allocated array of 250 students
17    Student coms1017[numStudents];
18    // A dynamically allocated array of 250 students
19    Student *IDSA = new Student[numStudents];
20
21    // Lets award some random marks
22    std::random_device rd;
23    std::default_random_engine eng(rd());
24    std::uniform_int_distribution<int> uniform_dist(0, 100);
25
26    for (int i = 0; i < numStudents; i++) {
27        IDSA[i].grade = uniform_dist(eng);
28    }
29
30    double average = 0;
31    for (int i = 0; i < numStudents; i++) {
32        average += IDSA[i].grade;
33    }
34    cout << "Average Grade: " << average / numStudents << endl;
35
36    // Always free dynamically allocated memory!!!
37    delete [] IDSA;
38    delete [] moreNumbers;
39 }
We can also construct 2D arrays.
1 int m = 4, n = 3;
2 // Statically Allocated – 1 Contiguous Block
3 int table[m][n];
4 // Fill it with numbers
5 for (int i = 0; i < m; i++) {
6     for (int j = 0; j < n; j++) {
7         table[i][j] = 10*i + j;
8     }
9 }
10 // Print it
11 for (int i = 0; i < m; i++) {
12     for (int j = 0; j < n; j++) {
13         cout << table[i][j] << "\t";
14     }
15     cout << "\n";
16 }
17 cout << endl;
18
19 // Dynamically Allocated
20 // 1 Contiguous Block of m int* & m contiguous blocks of n ints
21 int **table1 = new int*[m];
22 for (int i = 0; i < m; i++) {
23     table1[i] = new int[n];
24 }
25 // Fill it with numbers
26 for (int i = 0; i < m; i++) {
27     for (int j = 0; j < n; j++) {
28         table1[i][j] = 10*i + j;
29     }
30 }
31 // Print it
32 for (int i = 0; i < m; i++) {
33     for (int j = 0; j < n; j++) {
34         cout << table1[i][j] << "\t";
35     }
36     cout << "\n";
37 }
38 cout << endl;
39 // Always free dynamically allocated memory!
40 for (int i = 0; i < m; i++) {
41     delete [] table1[i];
42 }
43 delete [] table1;
2.14 Static & Dynamic Allocation
C++ has two areas where variables can be stored:
- The Stack (or Call Stack)
- The Heap (or FreeStore)
When you declare a variable using the new keyword, you are telling the compiler to reserve space on the heap for that variable. When you declare a variable normally without the new keyword, the compiler reserves space for that variable inside the stack.
int fun(){
  int   a = 42;          // One int on the call stack, value is 42
  int *p1 = new int(42); // One int on the heap, value is 42
  int *p2 = new int[42]; // 42 ints on the heap
}
When a function gets called, the compiler automatically allocates enough space on the call stack to store all of the automatically allocated variables in the function. When the function returns, it reclaims all the memory that the function used on the stack and destroys any static variables that were created within that function’s frame (i.e. it will run the destructors for each variable if one exists).
Dynamically allocated variables, are stored on the heap, and they continue to live until they are explicitly freed or until the program is terminated.
There are some important implications based on what variables get automatically destroyed. Firstly, when you want to return an object or array from a function using a pointer, you must allocate that object dynamically as all automatic objects are destroyed when the function returns.
For example, the code below returns address of an automatically allocated local array. Never do this! The array is destroyed once the function completes and now we have returned a pointer to garbage.
char* allocate_and_fill(char c){
    char output[5]; // Static allocation

    for(int i = 0; i < 5; i++){
        output[i] = c;
    }
    return output;
}
void print_array(char* arr){
    for(int i = 0; i < 5; i++)
        cout << arr[i];
    cout << endl;
}

int main1(){
    char *arr1 = nullptr;
    char *arr2 = nullptr;

    arr1 = allocate_and_fill('a');
    print_array(arr1);

    arr2 = allocate_and_fill('b');
    print_array(arr2);
}

int main2(){
    char *arr1 = nullptr;
    char *arr2 = nullptr;

    arr1 = allocate_and_fill('a');
    arr2 = allocate_and_fill('b');

    print_array(arr1);
    print_array(arr2);
}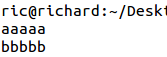
Figure 2.7: main1: Fill, Print, Fill, Print
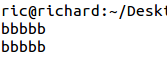
Figure 2.8: main2: Fill, Fill, Print, Print
Looking at the output, we can see that main1 (Figure 2.7) seems to print the correct result, but when we rearrange the code to main2 (Figure 2.8), the program is clearly wrong! This is because the first time allocate_and_fill runs, it returns a pointer to locally allocated memory inside the function. When the function finishes, this memory is reclaimed by the system. In the first example, we read the memory before anything else has a chance to overwrite it, but in the second example, when we call the function a second time, it happens to be allocated the same memory as the first time and overwrites the original contents. This is very dangerous behaviour.
The code below shows one correct way of returning such an array, where we now allocate the array dynamically on the heap. This means it continues to exist after the function returns, and we will need to manually free that memory when we are done with it.
char* allocate_and_fill(char c){
    char *output = new char[5]; // Dynamic allocation

    for(int i = 0; i < 5; i++){
        output[i] = c;
    }
    return output;
}
The second important implication of allocating space on the heap is that it persists until our program terminates. This means that if we repeatedly call a function like our corrected allocate_and_fill without manually freeing the memory, we will eventually use up all the memory on the system and the computer will probably crash. An easy rule of thumb is that every new must have a corresponding delete, and every new[] must have a corresponding delete[].
2.15 Recursion
Recursion is when a function calls itself. Recursion is used to solve problems when a larger problem can be solved in terms of a similar smaller problem. The Factorial and Fibonacci functions are good examples.
Consider the factorial as defined in maths:
n! = n × (n − 1) × (n − 2) ··· 2 × 1 = n × (n − 1)!We can see that n! is just n multiplied by (n − 1)!. In turn, (n − 1)! is just (n − 1) multiplied by (n − 2)! and this continues until we reach 1. This should look very similar to mathematical induction, and just like we need a base case in induction, we need a terminating point in recursion. In programming, this termination point is called an escape hatch. In this example, we can terminate when we reach 1 or even 0. The code below shows a recursive solution to the factorial problem.
1 #include <iostream>
2
3 using namespace std;
4
5 int factorial(int n){
6     // Escape hatch. 0! = 1 by definition
7     if(n == 0) return 1;
8     // There’s probably an error if its negative
9     if(n < 0) return -1;
10
11    // n! = n * (n-1)!
12    return n * factorial(n-1);
13 }
14
15 int main(){
16    cout << " 5! = "   << factorial(5)
17         << "\n 8! = "  << factorial(8)
18         << "\n1000! = " << factorial(1000) << endl;
19 }
Where F0 = F1 = 1, the Fibonacci sequence is defined as \(F_n = F_{n−1} + F_{n−2}\).
What do you think a recursive solution to this problem would look like? What escape hatch would we need?
2.16 Debugging
Debugging is twice as hard as writing the code in the first place. Therefore, if you write the code as cleverly as possible, you are, by definition, not smart enough to debug it.
Brian W. Kernighan
Finding bugs in your code can be an incredibly difficult task. When you have large, complex software systems, tracking down and fixing a bug can be a huge investment. In the best case, your code will crash and you’ll know that there is a problem. In the worst case, your code may continue running, but might have subtly corrupted it’s internal memory structures - in this case it looks like it is working, but may give you incorrect results. Debugging is such an important process that many software design patterns and tool have been developed purely to make debugging easier.
The most important tool when there is a bug in your code is called the debugger. It allows you you pause the execution of your code (with a breakpoint) and inspect the state of your program’s memory. You can view the call stack and the value stored in any of the memory addreses belonging to your application. You can also step through your code line by line and see where things start to go wrong.
Another useful time to pull out the debugger is when your code crashes. Unfortunately, C++ does not give us particularly useful error messages when our application crashes. Often it will just say Segmentation fault (core dumped). This generally means that we’ve tried to access memory that our program is not allowed to access and the operating system shut down the program for security purposes. Without a debugger it can be extremely hard to find out where our code crashed, but if we run our code with a debugger then it will show us exactly which line was running when the code crashed.
The video below explains how to use the GDB debugger. In general, you should always use a debugger — either directly via gdb in the terminal, or through VS Code’s built-in graphical debugger (see 2.17).
2.17 Setting up your environment
2026 Update — now using VS Code
There are three separate pieces to set up, and it is important to understand that they are separate: (1) a compiler, which turns your C++ source code into a program the operating system can run, (2) VS Code, the text editor you’ll write your code in, and (3) the C/C++ extension for VS Code, which gives you syntax highlighting, IntelliSense, and debugging support. VS Code does not come with a compiler — you must install one yourself, per the instructions for your operating system below.
2.17.1 Install a C++ compiler
2.17.1.1 Windows
The recommended way to get a C++ compiler on Windows is via MSYS2, which provides g++ (MinGW-w64) and gdb.
Download and run the installer from https://www.msys2.org.
Follow the installer’s default prompts. When it finishes, it will open an “MSYS2 MSYS” terminal.
In that terminal, install the compiler toolchain and debugger:
Add
C:\msys64\mingw64\binto your WindowsPATH(search “Edit the system environment variables” in the Start Menu → “Environment Variables” → editPathunder “User variables” → “New” → paste the folder path).Open a new Command Prompt or PowerShell window (the PATH change only applies to newly opened terminals) and verify:
2.17.1.2 macOS
macOS ships with Clang (a C++ compiler compatible with the g++/clang++ command) via the Xcode Command Line Tools, but it isn’t installed by default.
- Open Terminal (Applications → Utilities → Terminal, or search with Spotlight) and run:
A popup will appear — click Install and accept the license agreement. This downloads and installs Clang,
make,lldb(the debugger), and other command-line build tools.Once installation finishes, verify in the same terminal:
2.17.2 Install VS Code
Download the installer for your operating system from https://code.visualstudio.com — the site auto-detects your OS.
Windows: Run the downloaded installer. On the “Select Additional Tasks” page, make sure “Add to PATH” is checked (it is checked by default) — this lets you type code from any terminal.
macOS: Open the downloaded .zip, drag Visual Studio Code.app into your Applications folder. Then open VS Code, open the Command Palette (Cmd+Shift+P), and run “Shell Command: Install ‘code’ command in PATH” so you can launch VS Code from Terminal.
Linux: Download the .deb package and install it with:
or install it directly from the terminal without visiting the website:
2.17.3 Install the C/C++ extension
Open VS Code, click the Extensions icon in the sidebar (or Ctrl+Shift+X / Cmd+Shift+X), search for “C/C++” (published by Microsoft), and click Install.
This gives you IntelliSense (autocomplete, function signatures, error squiggles) and integrates with the debugger. It does not provide a compiler — that’s the step you already did above.
2.17.4 Compiling and running your code from the terminal
Open the integrated terminal in VS Code with Ctrl+` (or Terminal → New Terminal). This is a real terminal running inside the editor, in the folder you currently have open, so cd, ls/dir, and everything else works exactly as it would outside VS Code.
To compile and run a single-file program:
On Windows, the compiled program is named main.exe, and you run it with .\main.exe (or .\main) in PowerShell, or main.exe in Command Prompt.
A quick breakdown of the flags used above, since you will use them constantly this semester:
-std=c++17— use the C++17 language standard.-Wall— turn on (almost) all compiler warnings. Read and fix these; a warning today is a bug tomorrow.-g— include debug symbols, whichgdb/lldb(and VS Code’s debugger) need to show you meaningful line numbers and variable names.-o main— name the output executablemaininstead of the defaulta.out.
For a project with multiple .cpp files, list them all: g++ -std=c++17 -Wall -g file1.cpp file2.cpp -o main. Lab projects will generally come with a makefile so you can just run make instead of typing this out — see the Makefiles section above.
2.17.5 (Optional) Debugging in VS Code
While gdb/lldb directly in the terminal always works, VS Code’s C/C++ extension gives you a graphical debugger: click in the gutter to the left of a line number to set a breakpoint (a red dot appears), then open the “Run and Debug” view in the sidebar and click the green play button. The first time you do this for a project, VS Code will ask you to select an environment (choose “C++ (GDB/LLDB)”), which generates a launch.json file recording how to build and launch your program for debugging — you only need to do this once per project.
Once running, you can inspect variables by hovering over them, step through code line by line, and view the call stack — exactly as described in the debugging section above, just with a GUI instead of typing gdb commands directly.
Once you’ve completed the steps above, use Lab 1 as a sanity check: open its folder in VS Code, compile and run it from the integrated terminal, and confirm you can set a breakpoint and step through it with the debugger.