Chapter 12 Arrays and Vectors
In this chapter, we will look at C++’s equivalents to Python’s lists.
If you’ll recall, Python lists allowed us to store a collection of value
(of any type). In C++, we have two options: array, which is of fixed
size, and vector, which is of variable size. In both cases, however,
the type of data stored by these structures must be of the same type
(homogeneous). Thus we cannot store strings and integers in the same
vector, for instance. We will first look at arrays in C++, before
moving on to vectors, noting the differences between the two.
If you are writing code, remember to use the -std=c++11 flag. In
particular, the arrays we will cover here were introduced in the 2011
standard, and so this flag must be enabled in order to use them. If you are using
a modern C++ compiler, you shouldn’t have to worry about this. However,
for older versions (and in particular Dev-C++), please make sure to use
the flag.
12.1 C++11 Arrays
An array is a series of elements of the same type placed in contiguous memory locations (next to one another) that all have the same type. The major characteristic of an array is that it has a fixed size—while Python lists can grow and shrink as we add and remove elements, C++ arrays remain of fixed length. As a result, we must know the size of the array before the program runs. If we do not know upfront how large an array should be, then it is likely not a good situation to use an array!
When declaring an array, the compiler must allocated space in memory for
it. We must thus specify, upfront, the type and number of elements being
stored in the array. In this way, the compiler can compute how much
memory is required. In order to declare an array, we must first include
the <array> header file. The general form of an array declaration
array<type, arraySize> arrayName. For example:
array<int, 9> myArray;The above declares an array that will hold 9 integers. If each integer
is 4 bytes, then the compiler can determine that it must allocate 36
bytes of memory to the array. The following is an example of using an
array in practice. As with Python lists, we can refer to particular
elements in the array by specifying their index and using the []
operator.
#include <iostream>
#include <array> //must use this!
using namespace std;

int main(){
    array<int, 5> d; // d is an array of 5 int values
    // initialize elements of array d to 0
    for (int i = 0; i < d.size(); ++i){
        d[i] = 0; // set element at location i to 0
    }

    cout << "Element\tValue" << endl;

    // output each array element’s value
    for (int j = 0; j < d.size(); ++j){
        cout << j << "\t\t" << d[j] << endl;
    }
    return 0;
 }

/*
Output:

Element Value
0       0
1       0
2       0
3       0
4       0
 */
In the above, note that we use the size function to return the size of
the array (where Python uses len). We use a loop (Line 8) to
initialise our array to contain only 0. Without this loop, the values in
our array would be undefined. If we wish to declare and define the
values in our array on a single line, we can do so using an initializer
list as follows:
#include <iostream>
#include <array>
using namespace std;

int main(){

    // Declare and use a list of initializers to initialise d
    array<int, 5> d={ 10, -1, 2, 4, 100 };

    cout << "Element\tValue" << endl;

    // output each array element’s value
    for (size_t j = 0; j < d.size(); ++j){
        cout << j << "\t\t" << d[j] << endl;
    }
    return(0);
 }

 /*
Output:

Element Value
0       10
1       -1
2       2
3       4
4       100
 */
Note that if our initializer list contained less than 5 values, the remaining values in the array would be set to zero. This a quick way of initializing an array to be all zeroes is simply:
array<int, 5> d = {};When specifying the array size, the compiler must be able to prove the
size of the array at compile-time (that is, before the program is even
run). Thus we cannot use variables to specify the size (because
variables can vary in value). Either we must use a literal value (such
as a number), or we can use a constant variable. A constant variable
is a variable whose value is fixed and cannot change. Good examples of
constant variables are variables that store the value of unchanging
numbers, such as the number of days in the week, or \(\pi\). As such, the
following are legal examples of array declarations:
array<int, 5> A; //valid because 5 is fixed
const int N = 5;  // const indicates that it is fixed
array<int, N> B; //valid because N is constant
The following are invalid declarations, and a compile error will occur:
int N;
cin >> N
array<int, N> A; // invalid because N is unknown at compile time
int M = 5;  // normal variable
array<int, M> B; //invalid because M is a regular variable
12.1.1 Accessing array elements
C++ arrays support indexing, which allows us to retrieve the \(n\)th element of an array. However, C++ does not provide any bounds-checking to prevent you from accessing an element that does not exist! Thus we may mistakenly try to access the tenth element of an array of size 5, and C++ will not complain. It is therefore important to ensure that the index we use is within the array’s bounds—that is, greater than or equal to 0 and less than the number of array elements.
Allowing programs to read from or write data to array elements outside the array’s bounds is a common security flaw. Such an error is called a buffer overflow, and can cause the program to crash, or even appear to execute correctly while using bad data. It can also allow attackers to exploit a system and execute their own code.
Hacking side quest! Learn about the “buffer overflow exploit,” where a hacker can exploit the above error to take control of a program and run their own code! This tutorial here walks you through how to do this with a C program (which you will notice is very similar to C++).
12.1.2 Iterating over arrays
While we should ensure that we never make such an error, a better approach is to write code so that we can never make such an error in the first place. Recall that in Python, we could loop through lists in the following manner:
values = [1, 2, 3, 4, 10]
for x in values:
    print(x)
Note here that we can loop through the array and access every element without specifying an index. Since we have not specified an index, there is no chance of us specifying an out-of-bounds index! C++11 provides similar functionality using a range-based for-loop. You should always prefer this kind of loop, provided you do not need access to the index value itself. The general form of the range-based for-loop is:
for (<variable_declaration> : expression){
    //statements
}
If we were to rewrite the above Python example in C++, it would look very similar to the Python version:
array<int, 5> values = {1, 2, 3, 4, 10};
// the type declaration below must be consistent with the array type
for (int x : values){ //we use a colon instead of in
    cout << x << endl;
}
We can also combine references with range-based for-loops to loop over an array safely while modifying the elements.
#include <iostream>
#include <array>
#include <cstdlib>

using namespace std;

int main(){
    array<int, 5> d = {1, 2, -1, 3, 5};
    cout << "Items before modification: " << endl;
    for (int item : d){
        cout << item << " ";
    }
    //multiple elements of d by 3
    for (int &itemRef : d){
        itemRef *= 3;
    }
    cout << endl << "Items after modification: " << endl;
    for (int item : d){
        cout << item << " ";
    }
    cout << endl;
    return 0;
}

/*
Items before modification:
1 2 -1 3 5
Items after modification:
3 6 -3 9 15
*/
In the above, we use an integer reference (Line 14) because d contain
int values and we want to modify each element’s value Because
itemRef is declared as a reference, any change you make to itemRef
changes the corresponding element value in the array. If itemRef was
not declared as a reference, then modifying it within the loop would not
change the array’s elements.
To summarise, we have looked at three different ways of looping over an array:
for (int i = 0; i < arr.size(); ++i){
    //use if we explicitly need the value of i
    cout << i << ":\t" << arr[i] << endl;
}
for (int element : arr){
//modifying element will not affect the array
cout << element << endl;
}for (int &element : arr){
//modifying element will affect the array
cout << element << endl;
}
12.1.3 Multidimensional arrays
Recall that to declare an array, we specify its size and type. Its type
can be any built-in type, such as integers or floats, but it can also be
of type array. This allows us to have arrays of arrays, also known as
multidimensional arrays.
A multidimensional array is an array with 2 or more dimensions. We can think of a standard array as a single row, whereas two-dimensional arrays can be thought of as tables or matrices, with data arranged into rows and columns. If we have a 2D array, then we must specify two indices: the first index is the row, and the second is the column.
Let us now declare a 2D array with 3 rows and 4 columns:
const int ROWS = 3;
const int COLS = 4;
array<array<int, COLS>, ROWS> arr;
In the above declaration, we have created an array called arr of size
ROWS, where each element is of type array<int, COLS>. Thus we have a
table of size ROWS \(\times\) COLS. In the image below, we can see how
the elements of the 2D array are laid out, and that we must use two
indices if we wish to access any single element:
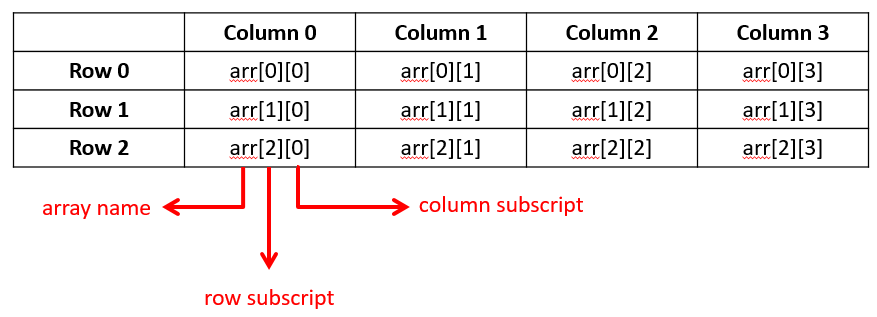
Figure 12.1: A 2D array with the subscripts/indices of each element in the array.
As with normal arrays, we can use initializer lists to initialise them with values when they are declared. In the following program, we construct two 2D arrays, and create a function that will print out their contents. Note that when looping through a 2D array, we need a nested loop. The outer loop iterates over each row (Line 13), while the inner loop iterates through the columns of a given row (Line 15).
#include <array>
#include <iostream>

using namespace std;

//remember const!
const int ROWS = 2;
const int COLS = 3;

void printMatrix(array<array<int, COLS>, ROWS> matrix){
    //for each row
    for (int row = 0; row < matrix.size(); ++row){
        //for each element in the current row
        for (int col = 0; col < matrix[row].size(); ++col){
            cout << matrix[row][col] << ' ';
        }
        cout << endl;
    }
}

int main(){
    array<array<int, COLS>, ROWS> matrix = {
        1, 2, 3,
        4, 5, 6
    };
    cout << "Matrix: " <<endl;
    printMatrix(matrix);
    array<array<int, COLS>, ROWS> matrix2 = {
        7, 8, 9
    };
    cout << endl << "Matrix2: " <<endl;
    printMatrix(matrix2);
    return 0;
}

/*Output:
Matrix:
1 2 3
4 5 6

Matrix2:
7 8 9
0 0 0
*/
In the above example, we have used a count-based for-loop to iterate
over the 2D array. A quicker and safer way is to use the range-based
for-loop to do so. In addition, we can use the auto keyword, which was
introduced in C++11. This keyword informs the compiler that it should
work out the variable type for itself. Because our array is of type
array<int, COLS>, we can save on this by simply using auto and
asking the compiler to fill this in for us. A cleaner version of the
printMatrix function is below:
void printMatrix(array<array<int, COLS>, ROWS> matrix){
    for (auto row : matrix){
    //auto infers that row is of type array<int, COLS>
        for (auto element : row){
            cout << element << ' ';
        }
        cout << endl;
    }
}
12.1.4 Array operations
The standard C++ libraries provide very useful functions that can be
applied to arrays (and other containers such as vectors, which we will
shortly encounter). In order to access these, we must include the
<algorithm> header file. There are many functions that can be found at
http://www.cplusplus.com/reference/algorithm/, but we will outline a
few useful ones here.
12.1.4.1 Sorting
C++ provides functionality to sort arrays by ascending or descending
order using the sort function. An example of this is below:
#include <iostream>
#include <array>
#include <string>
#include <algorithm>

using namespace std;

int main(){
    array<string, 4> colours = {"blue", "black", "red", "green"};
    for (string colour : colours){
        cout << colour << ' ';
    }
    cout << endl;
    sort(colours.begin(), colours.end());
    for (string colour : colours){
        cout << colour << ' ';
    }
    return 0;
}

/*
Output:
blue black red green
black blue green red
*/
The begin() and end() functions refer to the start and end of the
array respectively (although end() is in fact one past the last
element). The sort function will thus know to sort all elements in the
range \([\text{begin()}, \text{end()})\). In order to sort in reverse
order, we would replace begin() and end() with rbegin() and
rend(). In this instance, our array would then be sorted in reverse
alphabetical order.
12.1.4.2 Searching
C++ provides the binary_search function that can be used to
determine whether a given value is contained inside the array. This is
an extremely efficient algorithm that can find a value in massive arrays
very quickly. However, the downside is that the array must first be sorted
in order for it to work. An example of searching for an element
in an array is below:
#include <iostream>
#include <array>
#include <string>
#include <algorithm>

using namespace std;

int main(){
    array<string, 4> colours = {"blue", "black", "red", "green"};
    sort(colours.begin(), colours.end()); //must be sorted
    string key = "black";
    //look for black
    bool found = binary_search(colours.begin(), colours.end(), key);
    if (found){
        cout << "We found the key 'black'" << endl;
    }
    return 0;
}
C++ also provides the count function, which is used to determine the
number of elements equal to a particular value. Unlike the previous
function, the array does not need to be sorted for this to work. An
example of the count function is below:
#include <iostream>
#include <array>
#include <algorithm>

using namespace std;

int main(){
    array<int, 5> nums = {1, 2, 3, 100, 2};
    //counting number of twos
    int numOccurrences = count(nums.begin(), nums.end(), 2);
    cout << 2 << " appeared " << numOccurrences << " times" << endl;
    return 0;
}

/*
2 appeared 2 times
*/
Finally, the count_if function determines the number of elements
satisfying some condition. We can use this by specifying the array to
search over, as well as the name of a Boolean function. count_if will
return the number of elements that, when passed to the Boolean function,
return true. An example of this is below:
#include <iostream>
#include <array>
#include <algorithm>

using namespace std;

bool isEven(int x){
    return x % 2 == 0;
}

int main(){
    array<int, 5> nums = {1, 2, 3, 100, 2};
    //counting number of even numbers
    int numOccurrences = count_if(nums.begin(), nums.end(), isEven);
    cout << numOccurrences << " numbers are even" << endl;
    return 0;
}

/*
3 numbers are even
*/
12.2 Vectors
Arrays are great, but their main downside is the need to specify the
size upfront. If we do not wish to do this, we can use C++’s vector.
Like arrays, a vector represents a series of elements of the same type
placed in contiguous memory locations. However, vectors also provide
additional flexibility in that they are able to dynamically resize
themselves! We therefore do not need to know beforehand how many
elements will be stored in the vector—we can simply add them to the
vector as necessary, and the vector will take care of allocating more
space for them. In practice, there is often no need to use arrays at
all—vectors give us everything arrays can, and more!
12.2.1 Declaration
There are a few options when it comes to creating vectors. To begin, we
must first include the <vector> header. The following examples create
a vector of type integer, but the same applies to vectors of any type.
| Example | Comments |
|---|---|
vector<int> vec; |
Creates an empty (size 0) vector |
vector<int> vec(4); |
Creates a vector with 4 elements. Each element is initialised to zero. If this were a vector of strings, each string would be empty. |
We can also create a new vector that is a copy of an existing one, as in the example bellow
vector<int> vec(4, 42);
vector<int> vec2(vec); // create a new vector and copy each element from vec into vec2.
Note that unlike arrays, we need only specify the type of the elements of the vector. Like arrays though, we can indeed have multidimensional vectors.
12.2.2 Initialisation
Like arrays, we can also provide the vector with initial values. We can do this using either initialiser lists, or uniform initialisation. The following illustrates how to initialise the values of a vector directly:
vector<int> myvector = {9, 7, 5, 3, 1}; // initialization list
vector<int> myvector2 {9, 7, 5, 3, 1}; // uniform initialization
12.2.3 Iteration and Indexing
Indexing and iteration function exactly the same for vectors as they do for arrays. We briefly repeat what was said in the previous section here for ease of reference.
12.2.3.1 Indexing
Accessing individual elements in the vector is done using the subscript operator. Note that the subscript (or index) starts from \(0\) and runs up to one less than the length of the vector.
vector<int> myvector = {9, 7, 5, 3, 1};
cout << myvector[1]; //get and display the 2nd element
myvector[2] = 6; //modify the third element
The subscript operator does not do any bounds-checking. If an invalid index is provided, bad things will probably happen.
12.2.3.2 Iterating
There are primarily two ways of iterating over each element of a vector. We could use a for-loop, with a counter that starts at \(0\) and runs over the whole vector, as in the following example:
vector<int> myvector = {9, 7, 5, 3, 1};
for (int i = 0; i < myvector.size(); ++i){
    myvector[i] = myvector[i] + i;
    cout << myvector[i] << endl;
}
The advantage of this approach is that, within our loop, we have access to the current index, which we can then use to get the element at that position. However, we must be careful that our loop terminates appropriately, so that we do not try access or modify an invalid element.
If we do not need the index, a safer way of iterating is to use the range-based for-loop. For example:
array<int> myvector = { 9, 7, 5, 3, 1 };
for (int e : myvector){
    cout << e << endl;
}
Here we say “for each int e in the vector, print it out.” The
advantage of this is that we no longer need to worry about having to
check bounds; however, we lose access to the index.
As a final point, we could also use the range-based for-loop in conjunction with references. This would allow us to change each element as we loop over them:
vector<int> myvector = { 9, 7, 5, 3, 1 };
for (int &e : myvector){
    e = 0;
}
//after the loop, all the elements of the vector are zero!
12.2.4 Member Functions
Vectors have additional functionality above and beyond what arrays
possess. Unlike the algorithm functions we look at earlier (which can also
be applied to vectors), these functions exist in the <vector> file we include
at the beginning of the program. They are thus known as member functions, since
they belong to the vector class of objects.
These functions most commonly deal with operations that require some kind of resizing—something arrays are not capable of. A full list of functions can be found here http://en.cppreference.com/w/cpp/container/vector. We list some of the more useful functions below:
// Add an element to the end of the vector
vector<int> vec {1, 2, 3};
vec.push_back(4); // push_back is equivalent to Python's append
//now vec = {1,2,3,4}
//Clear all the elements from the vector and make it empty
vector<int> vec {1, 2, 3};
vec.clear(); //similar to Python!
//now vec = {}// Changes the number of elements stored
vector<int> vec {1, 2, 3};
vec.resize(5);
//now vec = {1,2,3,0,0}
vec.resize(1);
//now vec = {1}// The opposite of push_back(). Removes the last element of the vector
vector<int> vec {1, 2, 3};
vec.pop_back();
//now vec = {1,2}//Reserve memory in the background for the vector
vector<int> vec;
vec.reserve(100);
//now vec = {}, can add many
//ints before background resizing
//needed12.2.5 Additional Functions
In class, we discussed some of the additional functions provided by the
algorithm header file. As we saw, these functions do not accept the
object itself, but rather the begin() and end() markers (known
formally as iterators) of the object. Thus as long as whatever data
structure we’re working with (whether it be arrays, vectors, or some
other thing) provides a begin() and end() function, they can be used
with the algorithm header.
For instance, to sort a vector and array, we can simply do the following:
array<int, 4> arr = {2,1,3,4};
sort(arr.begin(), arr.end());vector<int> vec = {2,1,3,4};
sort(vec.begin(), vec.end());This illustrates that the sort function is independent of the data type its sorting. It does not care whether its an array or vector—from its point of view, they’re the same thing.